Top

40K-S Beta Test 2 Rules Menu (25-10-15)

Setting Up The Turn Activating Detachments & Orders Classes, Pinning & Fire Locking Attacking & Destroying Enemy Models Other Shooting Rules Transports Objectives Game End & Victory Conditions

Army Picker

Add detachment Show/hide colour preferences Hide all unused Show all unused

Total points: 0. Normal points: 0. Special points: 0.

Add detachment

Setting Up

Picking Armies

Before choosing their armies, players must agree on four things. Firstly, they must decide how big their game is going to be, by choosing an amount of points. This is how many points each player can spend on their army.

They must also decide on how many detachments they are going to control. Like their army point value, players should have control of the same number of detachments.

In addition, players need to decide on if there are any limits on the type of units they can add to their army. In 40K-S, by default, there are no limits, and players can add whatever units to their force that they like. However, players may decide to limit their choices to a particular army type, like Space Marines or Orks, for example.
Also, the army picker tracks how many points are being spent on "special" units, which are units considered to be powerful or rare. Players can also decide on if they wish to implement a limit on how many points can go towards these types of units.

Finally, they should decide on how they are going to balance their detachments, which can be by points value, or by unit count.

If the players decide to balance by points value, their total army points value should be split between all of their detachments, and players should try to get each detachment as close to this number as possible. For example, if players are playing a 3000pt game, they may decide to use 3 detachments, and split their armies into detachments of 1000pts each.

If they decide to balance by number of units, then players should take the units they've chosen for the game, and try to split them so that each detachment has the same number of units in it, or as close as possible.

Whichever method of balancing is being used, players can agree on how strict or how loose they can be with these limits. The only main limit is the total army points cost.

Adding Melee Combat Profiles
When using the army picker, deciding which melee profile(s) to take for a model can be a bit confusing. Simply put, a model must have a melee combat profile, provided it is allowed to attack in close combat.
If there are no special combat weapons available for that model, then you must make sure their basic profile has been added.
If there are special combat weapons available for that model, but you elect not to take them, then you must also make sure their basic profile has been added.
If at least one different melee profile is added to a model, for other weapons like swords, for example, then these overrule the basic profile, so the basic profile must not be added to the model.
If a model is given a melee profile with the Extra special rule, then this weapon is considered a bonus weapon, and does not overrule the basic profile.
The basic profile does not count as one of the weapons that a model can or must can take. It's only used if the model is unarmed in close combat.

Setting Up The Battlefield

One player sets up the board and terrain and the other player chooses which side they want to deploy on, or both players set up the terrain and the players roll off to see who chooses their deployment zone.

Remember to try and make the terrain interesting and fair, so that the game will be as close and as fun as possible.

Setting Up Objectives

Objectives are an optional part of the game, giving players areas of the battlefield to fight over in order to score extra points.

If one player set up the battlefield, then they should also place the objective counters. If both players set up the battlefield, then they should either discuss where the objectives should be placed, or take it in turns placing them. This should be done before rolling off to see who chooses their deployment zone.

There are no strict rules on the number of objective counters that should be used. But in general, the more points in the game, and the bigger the board, then the more counters should be placed. This of course will depend on the terrain layout.

Objective counters should not be placed in terrain that is impassable to infantry, and unless both players agree, they should not be placed within 8" of each other, or within 2" of the table edge.

Setting Up The Armies
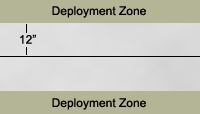
Deployment zones

Deployment zones

Armies are set up 12" away from the battlefield mid point, and therefore 24" away from each other. Players roll off, with the winner choosing who will deploy a unit first. Players then alternate placing units until all units are deployed.

Models within a unit must remain within 2" coherency (this may need increasing for units of larger models).

The Turn

Turn Structure

There are four phases that make up a turn of 40K-S, and during a turn both players will get to activate and use all of their units.

  1. Initiative Phase
  2. Psychic Phase
  3. Activation Phase
  4. Reinforcement Phase

Initiative Phase

At the start of each turn, players roll off to see who has the initiative. On the first turn, whoever finished setting up their models first gets +1 to this roll. On all other turns, the player who did not have the initiative last turn gets +1 to their roll. Re-roll ties.

Psychic Phase

Players alternate using their psykers. The player with the initiative decides who will go first.

Each psyker can perform one of the special psychic powers from their army's available powers.

Psykers do not use psychic shooting attacks during this phase - they will instead use those when they normally get to shoot.

Psychic powers used in this phase can always be used even if the unit is engaged in combat.

Unless stated in the power's description, powers that can target friendly units can be used on the psyker itself.

Activation Phase

In this phase, players will alternate activating a detachment each, which will allow them to use all of the units within that detachment. Play will then pass to the other player, who will activate one of their detachments, and so on, until all of the detachments have been used.

The player with the initiative decides who will activate one of their detachments first.

Reinforcement Phase

In this phase, players are given the chance to bring units that are not on the board yet into play. This will mostly be to bring in units that can deep strike, though other methods of using reserves may be decided upon by the players themselves.

If both players wish to bring in reserves this turn, then they should roll off, with the winner deciding who will place a unit first. Having the initiative has no effect during this phase.

Deep Strike
To deep strike a unit, place it on the tabletop further than 6" away from any enemy units.

Activating Detachments & Orders

When a detachment is activated, each unit within the detachment can be issued orders and used. Each order will allow a unit to perform one or more actions. An action must be completed before moving on to the next, but unlike in most wargames, a unit does not have to perform all of its allowed actions before the next unit can be used.

For example, a player could choose advance orders for a unit, and perform that unit's shoot action. Then they could choose charge orders for another unit, and perform both the move and fight actions one after the other. Then, if they wished, they could go back to the first unit to take their move action.

The orders available are as follows:

Advance

This order allows a unit to make two actions: move and shoot. When they make the move action they can move up to their normal movement allowance, and may engage enemy units. If they engage an enemy unit, they may then make a fight action.

If they engage the enemy before making the shoot action, they may only make the shoot action if they are not fire locked.

This order may not be used if any model in the unit is pinned.

Charge

This order allows a unit to make two actions: move and fight. The move action can not be made after making the fight action. When they make the move action they can move up to double their normal movement allowance, and may engage enemy units. If they engage an enemy unit, they may claim charge bonuses when they make the fight action.

If the move action is used to disengage from one or more enemy units, they may not re-engage any of those same units this turn.

This order may not be used if any model in the unit is pinned.

Charge bonus: When a unit successfully charges into combat, for that turn each model gets +1 attack when they fight. This bonus attack may be added to any of the model's melee profiles, except for any profile with the "Extra" special rule, as these profiles are always a fixed number of attacks.

Fall Back

This order allows a unit to make a move action. When they make the move action, they may move up to their normal move allowance, and must disengage from all enemy units.

This order may only be used if at least one model in the unit is pinned.

First Fire

This order allows a unit to make a shoot action. They may claim the first fire bonus when they make the shoot action.

This order may not be used if any model in the unit is fire locked. If engaged with an enemy unit but not fire locked, this order may not be used to shoot at the engaged enemy unit(s).

First fire bonus: Models in this unit may re-roll hit rolls of 1 when they shoot.

Overwatch

This order allows a unit to make a shoot action. The shoot action may only be used to attack enemy units they are engaged with.

When they make the shoot action, they must subtract 2 from their to hit rolls, but the action can still be taken even if models in the unit are fire locked.

This order may not be used if the unit was already engaged at the start of the turn.

Pile-In

This order allows a unit to make two actions: move and fight. The move action can not be made after making the fight action. Only models that are not pinned may move.

This order may only be used by a unit that is engaged.

Models that move may engage other enemy units besides those that they may already be engaged with, but their unit must remain engaged with the unit(s) they were already engaged with.

Classes, Pinning & Fire Locking

There are 5 "pinning classes" in the game, each made up of one or more "model classes":

  1. Infantry, cavalry, bikes, swarms, light artillery, light vehicles & monsters.
  2. Vehicles, walkers & monstrous creatures.
  3. Heavy vehicles, heavy walkers & giant monstrosities.
  4. Super heavy vehicles, super heavy walkers & gargantuan creatures.
  5. Praetorians, scout titans & monolithic creatures.

When models of two opposing units enter base to base contact, their units become engaged. It is only when two units are engaged that they may attack each other in close combat. Ordinarily, opposing units that are engaged may not be fired upon.

In addition, units may become pinned and/or fire locked when engaged. Ordinarily, a unit engaged with another unit that is of the same or higher pinning class becomes pinned. If a unit is engaged with an opposing unit that is of a smaller pinning class, then it is not pinned.

If a unit is pinned, it may not use advance, first fire or charge orders. If it wishes to retreat from the combat it must use fall back orders. If it wishes to attack back in combat it must use pile-in orders. And in some situations it may be able to shoot at the unit(s) it is engaged with by using overwatch orders.

A unit is fire locked (meaning it can not shoot any weapons) if it is engaged with any enemy units, unless all of the enemy units are two or more pinning classes smaller. If a unit is engaged but not fire locked then it can shoot its weapons out of the combat (but not into it), and may also have enemy units from outside of the combat shoot at it.

Attacking & Destroying Enemy Models

Each time a unit shoots or fights in close combat, then every model in the unit may attack with all of its available weapon profiles suitable for that action, provided there are no limitations stated elsewhere.

A player may freely split their unit's available weapon profiles against different enemy units, but each individual profile/weapon must direct its attacks at the same enemy unit.

For example, if a model has two guns, it may shoot one gun at one enemy unit, and the other gun at another enemy unit. But it may not split the attacks from the first gun between both enemy units.

Firing Weapons

Each time a model is allowed to fire, it may fire with all the ranged weapons it is armed with. Some weapons have multiple profiles. Some of these, such as the Missile Launcher, may only use one profile each time it fires. But some are able to fire multiple profiles at once. The special rules of the weapon will explain.

Short Range & Long Range
Models use their standard to hit statistic when shooting at an enemy unit within short range. Short range is up to 18" away (on advance orders) or 24" away (on first fire orders).
When shooting at long range, which is anything further than short range, the to hit roll of all weapon profiles is 5+.

Making Close Combat Attacks

When a unit fights in combat, each model in base contact with a model in an enemy unit may direct its attacks against that unit. In addition, any other models in the attacking unit that are not in base contact may still attack, provided they are within 4" of a visible model in an enemy unit they are engaged with.

Hits & Wounds

First roll to hit, then roll to wound. The following rules determine the score needed to wound:

When rolling to hit or wound, a hard roll of a 1 is always a fail, and a hard roll of a 6 is always successful, no matter the modifiers involved.

Saving Throws

WHAT KIND OF WOUND ALLOCATION ARE WE GOING TO USE?

Note that models that have been destroyed do not have to be removed from the tabletop unless they have already been used that turn. If that unit has not been used yet, then keep note of how many casualties have been sustained, and they will be removed after the unit is used.

Exploding Vehicles

Whenever any kind of vehicle, walker, praetorian or titan loses its last wound, the attacker must roll to see if it explodes.

The attacker rolls a D6, and adds on the AP of the weapon that took the final wound. If the score is 7 or more, the model explodes.

Every unit within 6" of the exploding model is hit a number of times equal to the amount of models in that unit that are within 6". The strength of this hits is 1 less than the toughness of the exploding model, and there is no AP.

This same procedure is followed for any units that might be embarked on a transport vehicle that explodes.

Note that the effects of an exploding vehicle are determined at the point of attack, but the vehicle itself, and any models that were destroyed by the explosion, can still be used that turn if they have not already been, just as normal.

Beleaguered & Decimated Units

In 40K-S an attempt has been made to make it feel like the combat all over the table is happening simultaneously. This means ordinarily it does not matter how much damage a unit takes before it is used that turn, as it is still possible to use the unit normally before applying the effects of the damage.

There is however one exception to this, and this is when a heavily damaged unit is chosen to move into close combat with the enemy. As the unit would be taking this damage from enemy fire while moving into combat, it has been deemed necessary to apply some negative effects if the damage is severe.

If, since the start of the turn, a unit has lost at least 50% of its models (or wounds, for units of 1 large model) before having the chance to act, it is considered to be "beleaguered".

A beleaguered unit may still act normally that turn, but if they move into combat (via charge or advance orders) all models in that unit must subract 1 from their to melee hit rolls that turn.

If a unit has been completely wiped out before it gets a chance to act, then it is considered "decimated".

A decimated unit may still be used that turn, with the following limiations:

If a decimated unit charges into combat, then it must subtract 1 from its melee hit rolls that turn. In addition, it may not claim any additional bonuses for charging into combat. These include the extra attack, and also other bonuses like the Lance special rule.

If a decimated unit advances into combat, then its melee attacks that turn will only hit on 6s.

Other Shooting Rules

Line Of Sight

Models can always trace line of sight through friendly models. Enemy units will block line of sight but only if they are of equal or higher pinning class than both the firing unit and the target unit.

If a firing unit or target unit has an elevated position, then a model's eye view will be required to see if the firing unit has line of sight.

Cover

If a unit is in soft cover, for example in a ruin or in a forest, then they become harder to hit, and anyone shooting at them must subtract 1 from their hit rolls. It is possible to shoot through soft cover at a unit on the other side, but this will incur a -2 penalty.

Hard cover, such as being in a building, also incurs a -1 to hit modifier, but also gives the models inside +1 to their saving throw if they get hit (or a save of 6+ if they do not have one). Hard cover such as a building can not be shot through.

If a model or unit is fairly obscured by solid cover, like the corner of a building or the brow of a hill, but can still be seen, then it too will gain a -1 to hit cover bonus.

Transports

By default, infantry and monsters can embark upon transports. Some other specialist vehicles may be able to carry other types of models, but this will be stated in the model's profile.

Infantry each take up 1 slot in a transport.
Bulky infantry each take up 2 slots in a transport.
Very bulky infantry and monsters each take up 3 slots in a transport.

A unit may start the battle embarked upon a transport. They may also embark or disembark during the game by using the following rules:

Embarking
In order for a unit to embark, either all models in an embarking unit must be within coherency of the vehicle at the start of their activation, or all models in the unit must be within move distance of the vehicle.
If all models in the unit were already in coherency with the vehicle at the start of their activation, and they are on advance orders, then they may shoot before they embark, or after they embark if the vehicle is open-topped. If the unit is outside of coherency, and they are on advance orders, then they must shoot before moving, if they are going to shoot at all.
If a transport has already moved that turn, then a unit may not embark upon it.
If a unit embarks upon a transport that has not been activated yet, then the transport may not move when it is activated later in the turn.
While Embarked
If the transport has not yet been activated that turn, a unit that wishes to disembark may act independently of the transport. For example, they may use advance or charge orders to get out of the transport, measuring distances from the transport, and go about their turn normally. Later on in the turn, the transport may also be used normally.
An embarked unit that does not wish to disembark prior to the transport being activated must wait until the transport itself is activated. This is true even if the embarked unit and the transport are from different detachments. The unit will then have to use the same order that the transport is given, and will activate at the same time, as if they are one unit.
If the transport is given first fire or overwatch orders, the unit inside may not disembark, but may shoot if the transport is open-topped. (Would the unit suffer the -2 overwatch to hit modifier)
If the transport is given advance orders, and the transport is open-topped, then the unit may shoot, but only when the transport does. The unit may disembark at the end of the transport's movement, and may engage enemy units when it does so.
If the transport is given charge orders, then the unit can disembark at the end of the transport's movement, and may engage enemy units when it does so, claiming charge bonuses.
If the transport is given pile-in orders, then the unit may disembark, provided that they also engage enemy units when they do so.
If a transport is given fall back orders, then any embarked units are not allowed to do anything when the transport activates.
Every model in a unit must be placed within the 2" coherency range of the transport when it disembarks. If it's impossible to do this for all models, then the unit may not disembark that turn.
If a unit disembarks from a transport which is on charge orders, and the transport has moved at least 3/4 of their maximum movement allowance that turn, then the unit has performed a dangerous disembarkation. Roll a number of D6s, equal to the amount of models in the disembarking unit, and any rolls of a 1 cause a wound to the unit that can not be saved by any means.

A transport vehicle may not have a unit embark and disembark from it on the same turn. Likewise, a unit may not both embark and disembark on the same turn.

Objectives

An objective is brought under the control of an army if at least one model from that army is within 2" of the objective counter, while no model from the enemy army is within 2".

The objective will remain under the control of that army provided no enemy model moves to within 2" of it, so the model or models that claimed the objective do not have to remain within 2".

Whenever it is required to count up victory points, each objective counter is worth 500pts to the player that controls it.

Game End & Victory Conditions

Unless players agree otherwise, a game will end after 5 turns. At this time, victory points should be totalled to see who has won the battle and by how much.

Of course, there are other ways to win, such as if a player surrenders, which automatically means the other player wins.

The players can also agree to play to a victory point target. To do this, victory points will need to be totalled at the end of every turn, and if either player has reached the target then the game is over. This means games can be over very quickly, or go on for much longer, depending on how the battle goes.

Each time they are asked total up victory points, players should add up how many points they have acquired from breaking and wiping out enemy units. If objectives are being used, the points for any under their control should also be added.

Players can set whatever points total they wish. But the following guidelines can be used as a good place to start:

So, in a 6000pt game with 6 objectives, for example, the victory point target would be 5500pts. This target is made of 4000pts for killing the enemy, plus 1500pts for claiming 3 objectives.